If you are offering your MacBook or Mac, trading it in, or simply passing it on to pals or household– you would be a good idea to clean the Mac and restore it to factory settings initially. This is partially so that your information remains safe, however it will likewise prevent any concerns at a later date that might happen if you do not detach that Mac from different services and software application you may utilize. It likewise implies the brand-new user can reboot the Mac as if it was brand name brand-new.
Simply keep in mind that if somebody is going to be utilizing the Mac after you, getting rid of individual info alone isn’t enough– you likewise require to ensure there’s a working variation of macOS set up later on. Read our guide to offering a Mac
Another reason that you may wish to clean your Mac is to carry out a tidy set up of macOS– which can be an excellent way to repair concerns with your Mac if it’s beginning to act strangely or you are anxious you may have an infection Cleaning a defective Mac will enable you to set it up like a brand-new Mac– which will ideally repair any software-related concerns you are having.
Initially a little bit of excellent news: If you have macOS Monterey or later an M1 or M2-series Mac, or a Mac with a T2 chip, the procedure for removing the material on your Mac is a lot easier than it utilized to be thanks to a choice in System Preferences/System Settings. We’ll go through the brand-new actions listed below prior to moving onto the more complex approach you’ll require to utilize on older Macs.
Follow our guide to do the following:
- Back up your Mac.
- Eliminate all your information from your Mac.
- Restore your Mac to its factory settings.
- Reinstall macOS.
Back up your Mac
Prior to you do anything you need to support or clone your Mac. This is because– as you would anticipate– resetting a Mac to factory settings eliminates all the information kept on that device.
Do not fall in to the trap we fell under: Since we utilize iCloud to sync all files throughout all our Apple gadgets we presumed that we might simply recuperate whatever we required from the cloud– which was real to a specific degree, however it wasn’t till after we cleaned the Mac that we understood that the information for one non-Apple app we utilized wasn’t in the cloud. In nowadays of working primarily in the cloud it is a simple error to make! Regrettably you can’t back up whatever on your Mac to iCloud
Fortunately supporting your Mac is simple to do– as long as you have a external disk drive to utilize. This can be done really merely utilizing Apple’s Time Maker software application– here’s how to support utilizing Time Maker The very best aspect of supporting with Time Maker is it makes it actually simple to move your information to a brand-new Mac later on.
If you do not wish to utilize Apple’s leisure time Maker software application, or you can make a clone of the entire disk drive utilizing a program like Carbon Copy Cloner or SuperDuper (both are readily available as totally free trials).
This cloned drive can be re-cloned back to the primary drive if you choose to restore your Mac, or it can be utilized to gain access to all the initial files and move them and all your settings to your brand-new computer system.
We have a total guide that discusses how to support a Mac along with this guide to the finest Mac Backup Software application.
Eliminate your Mac (macOS Monterey or later on)
Foundry
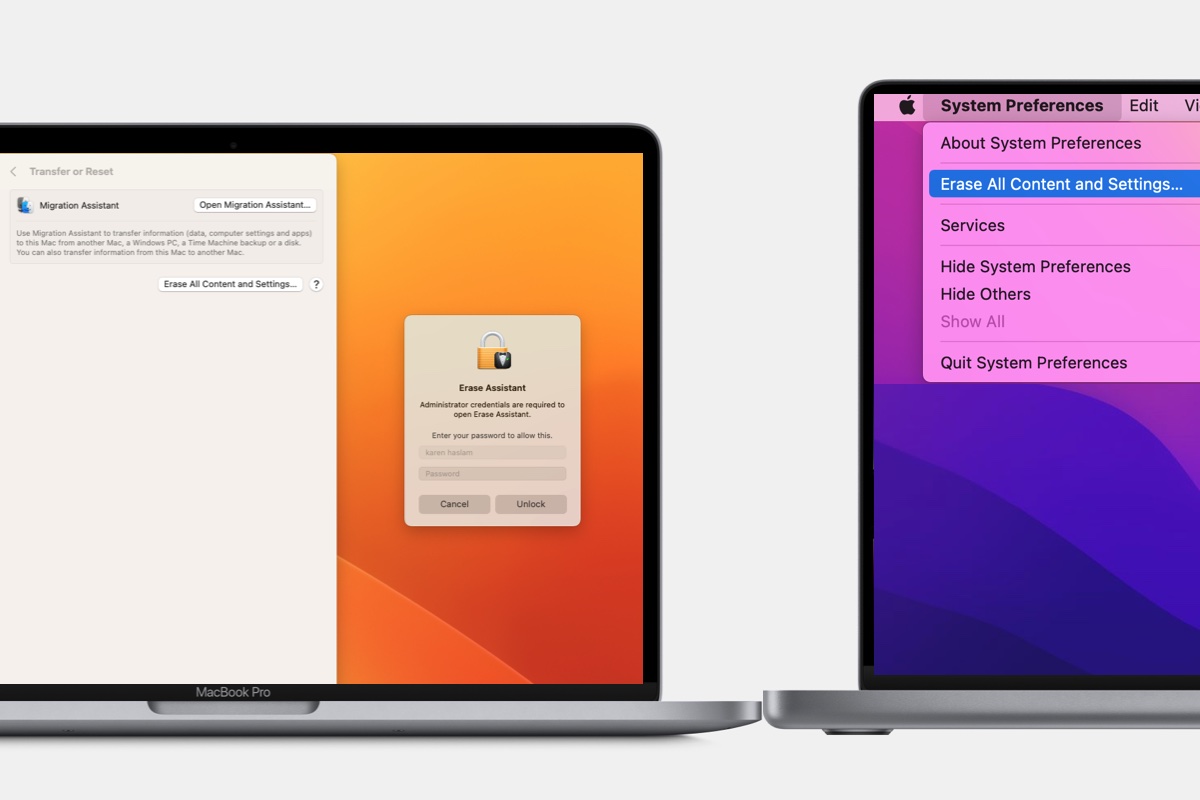
When macOS Monterey was presented in 2021 Apple included a brand-new choice in System Preferences (System Settings since macOS Ventura) for cleaning a Mac and returning it to factory settings.
Thanks to this brand-new “Eliminate All Material and Settings” choice, cleaning your Mac so that you can pass it on, offer it, or even if you wish to do a tidy set up in the hope that it will repair concerns is rather a basic procedure. Nevertheless you will require to have a M1-series Mac, M2-series Mac, or a Mac with a T2 chip inside. It likewise requires to be running either macOS Monterey or macOS Ventura.
If your Mac is older then the actions you require to take are a little bit more complex, we’ll run though the actions for older Macs listed below.
How to eliminate a M1/M2 Mac, or a T2 Mac
The brand-new choice that showed up in macOS Monterey looks after a great deal of the complex actions associated with cleaning your Mac– as long as it is an M1- or M2-series Mac or one with a T2 chip.
If you click the brand-new Erase All Material and Settings choice then whatever will be looked after, consisting of elimination of your kept finger prints for Touch ID and anything in the Wallet app, signing you out of your Apple ID, and shutting off Discover My and Activation Lock. Bluetooth gadgets will be unpaired. It likewise gets rid of all the accounts and their information and any volumes you have actually established on the Mac– so if you share the Mac with another person do ensure their things is supported too. It will likewise erase any applications set up on the Mac.
To begin this procedure you require to follow a little various actions depending upon which variation of macOS you are utilizing:
In Ventura or later on:
- Open System Settings.
- Click General.
- Pick Transfer or Reset.
- Select Erase All Material and Settings.
- Enter your password.
- Click continue.
In Monterey:
- Open System Preferences (System Settings if you are utilizing Ventura).
- Click System Preferences in the menu bar at the top of your screen.
- Click Erase All Material and Settings.
- Enter your password.
- Click continue.
At this moment you’ll be advised to do a backup with Time Maker prior to you start removal.
A window will then reveal you what will be erased, consisting of Apple ID, Touch ID, devices, and Discover My settings.
Lastly you will require to log out of your Mac and all associated services utilizing your Apple ID.
Prior To your Mac is eliminated you get a last caution, so if you have doubts a minimum of you can stop at this moment!
Having actually clicked the 2nd Erase All Material & & Settings your Mac will reboot.
When your Mac reboots you can go through the actions to set it up as brand-new, or you can leave it at this phase for the next owner to establish. Simply turn the Mac off initially.
Which Macs have a T2 chip?
Eliminate All Material and Settings will work for Intel Macs that have the T2 security chip, these consist of:
- MacBook Air from 2018
- MacBook Pro from 2018
- Mac mini from 2018
- iMac 27-inch from 2020
- iMac Pro
- Mac Pro from 2019
If you have a Mac with a T2 chip you need to have the ability to upgrade it to macOS Monterey, or macOS Ventura, and utilize the Erase All Material and Settings choice, which will be easier than the actions would otherwise be.
That’s it. If you are fortunate sufficient to have a Mac with Apple silicon, or a Mac with the T2 chip that is all you require to do. Otherwise proceed to the next action.
Eliminate your Mac (Intel Macs without T2 chip)
Apple
If you wish to clean an older Intel-powered Mac that does not have the T2 chip (see the list of Macs above) you will have a more complex journey to reset your Mac to factory settings.
You will require to sign out of the different services you utilize, deauthorise accounts, and unpair Bluetooth gadgets, prior to beginning your Mac up in Healing mode so that you can erase your information. We’ll go through each action listed below.
Indication out of services
Foundry
You understand you require to eliminate the Mac prior to you pass it on, however prior to you erase whatever there’s some more admin to do initially.
Prior to you start the procedure of cleaning your Mac it deserves signing out of the following to prevent headaches later:
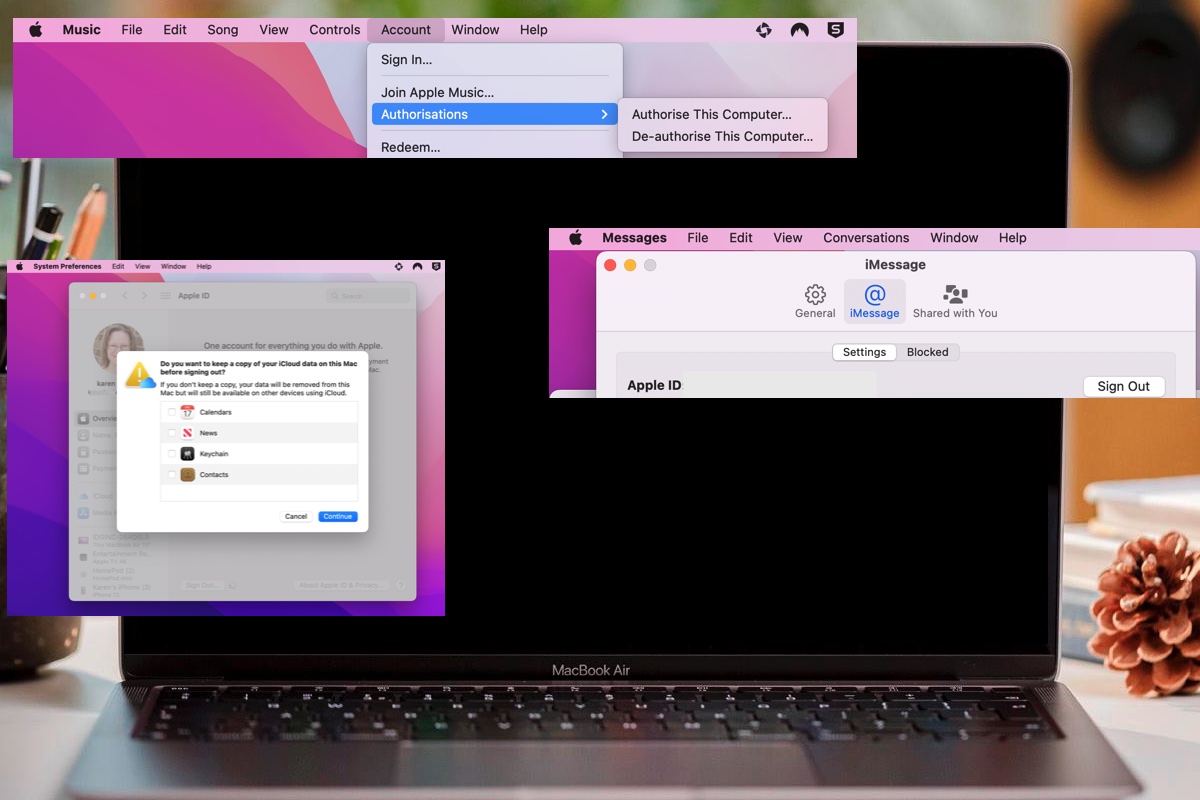
Indication out of Discover My: Open System Preferences and click your name in the Apple ID/iCloud area. Scroll down to the Discover My Mac area and click Choices. Click Turn Off next to Discover My Mac and Fins My network.
Indication out of iMessage: Open Messages on your Mac and click Messages in the menu bar. Click Settings/Preferences > > click the iMessage tab > > Indication out.
Indication out of your Music/iTunes account: You will require to deauthorise your Apple Music and/or iTunes Shop account and log out. This is essential due to the fact that you can just consume to 5 Macs to play music that are locked to your account. Open the Music app > > Click Account > > Click Authorisations > > De-authorise this computer system. Then click Account > > Indication Out.
Indication out of your television account: Similar To the Music app you have a limitation to the variety of gadgets that can play motion pictures you have actually purchased from the iTunes Shop, so you need to sign out of your account in the television app. Open the television app > > Click Account > > Click Authorisations > > De-authorise this computer system. Then click Account > > Indication Out.
Indication out of iCloud: Open System Preferences and click your name in the Apple ID/iCloud area. Then sign out. When it asks if you wish to keep a copy of the iCloud information simply deselect whatever (obviously ensure you back that info up someplace). Then click Continue and wait on it to sign out (which might take a while). If you utilize iCloud Image Library you’ll be asked if you wish to download pictures to the Mac (you do not unless you wish to make a back up of this cloud based library). Lastly enter your Apple ID Password to verify, and get in the password for the Mac.
Another method to be definitely sure that none of your individual settings stay on the Mac is to reset the NVRAM. We go over how to do that here: How to reset the NVRAM, PRAM, and SMC on any Mac
Unpair Bluetooth gadgets
Apple
It’s likewise an excellent concept to unpair your Bluetooth gadgets. This is specifically crucial if you are passing your Mac on to somebody in your house or workplace as any Bluetooth gadget that might have when been coupled with your old Mac might link to the old one once again
- Open System Preferences > > Bluetooth.
- Unpair your gadgets.
Simply remember you will require your mouse and keyboard for the next actions so plug them in if you can.
Shut Off FileVault (if you utilize it)
Apple
FileVault file encryption can make it challenging for unapproved individuals to access the information on your Mac. If you are utilizing FileVault to secure the information on your Mac you need to turn it off prior to you erase your information and prepare the Mac for sale– this appears illogical as you wish to safeguard your information, however you will be getting rid of the information so there is absolutely nothing to safeguard, however, more most importantly, if you leave FileVault on the individual who you pass your Mac to would require to enter your password to open the disk prior to they can establish the Mac.
Here’s how to switch off FileVault:
- Open System Preferences.
- Click Security & & Personal privacy.
- Click FileVault.
- Click the lock and enter your name and password.
- Click Shut Off FileVault.
Reboot your Mac in Healing (Intel Mac)
Foundry
Now you have actually backed whatever up, deauthorised your accounts and unpaired gadgets, you are all set to begin to eliminate whatever on the Mac. To do so you require to get in Healing mode. This will allow you to clean the Mac.
We’ll information how to get in Healing design on an Intel Mac here, the procedure is various on M1 and M2 Macs, however you will not require this action if your Mac has an Apple chip. (If you wish to know how to get to Healing on a n M1 or M2 Mac we go through that in another post.)
How to get in Healing on a Mac with an Intel processor
- Click the Apple logo design on top left of the screen and choose Restart.
- Instantly hold down the Command and R secrets till you see an Apple logo design or spinning world. (You might be much better off utilizing a various crucial mix depending upon the age of your Mac, and which macOS you desire set up or was set up on the Mac when you purchased it– we have a total guide to beginning a Mac in Healing Mode here). For instance, Apple advises that “if you’re offering or handing out a Mac that is utilizing OS X El Capitan or earlier, utilize Option-Command-R to ensure that the setup isn’t related to your Apple ID”.
- Anticipate it to take a while for the Mac to launch in this mode.
- You might see a screen asking you to select a language.
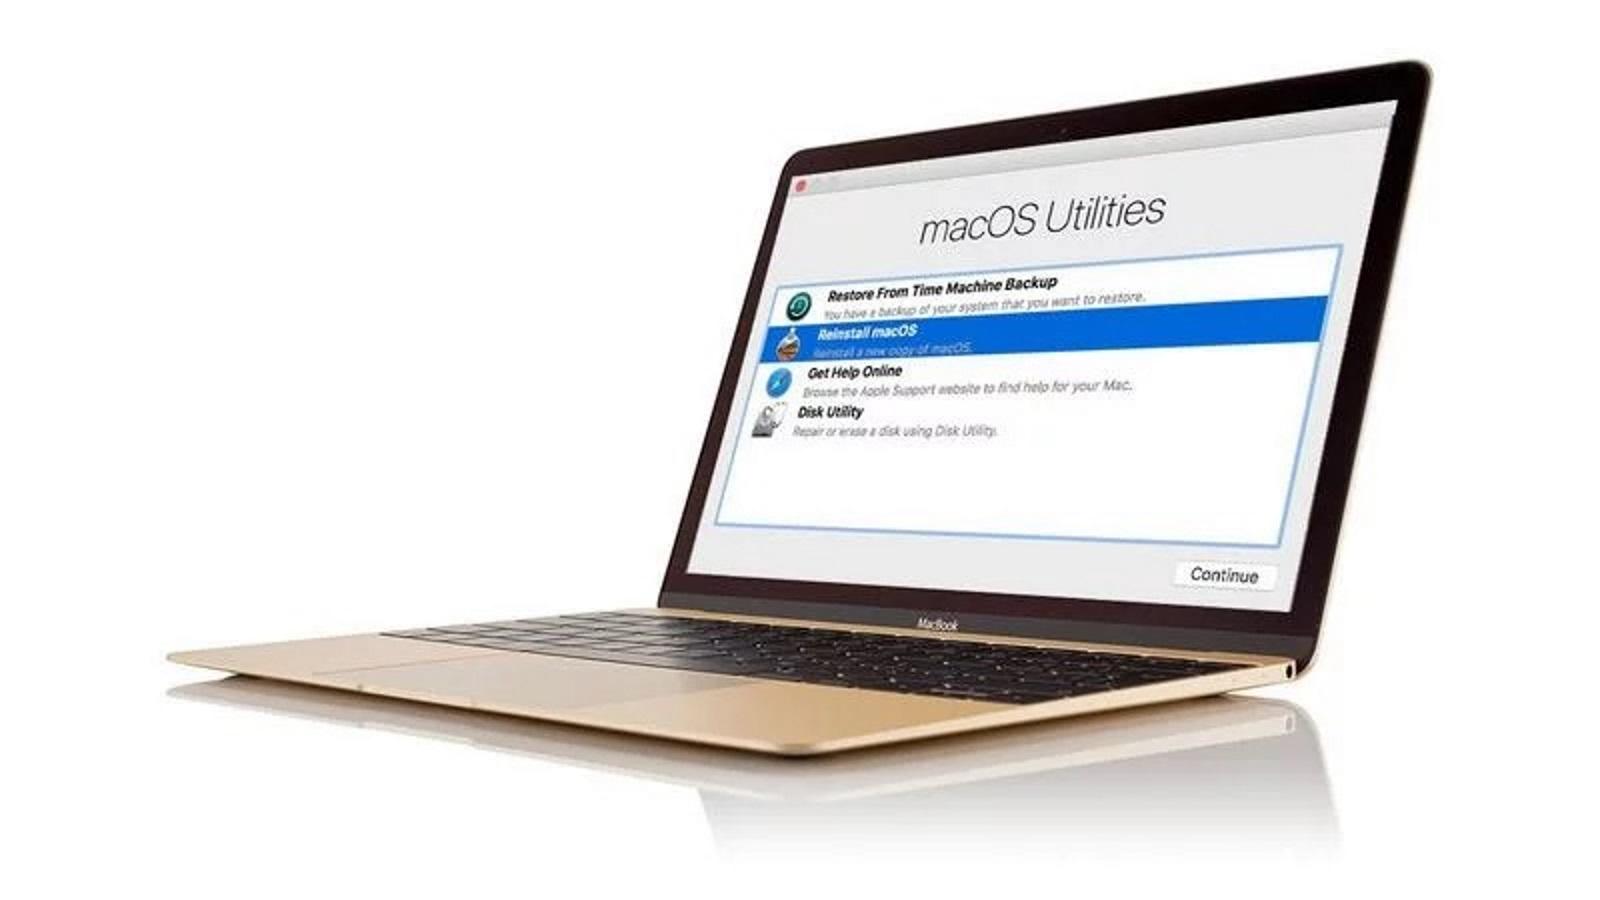
- The next screen you’ll see is the Healing Mode Utilities window.
Eliminate and reformat your Mac (Intel Mac)
Foundry
Now you have actually gone into Healing you can eliminate your Mac.
Once again, the directions are a little various depending upon the variation of macOS you are utilizing and whether your Mac is Intel or M1.
We’ll go through the approach in Monterey, Big Sur and Catalina, prior to moving onto Mojave and previous variations of macOS listed below that.
How to erase your Mac in Big Sur/Monterey
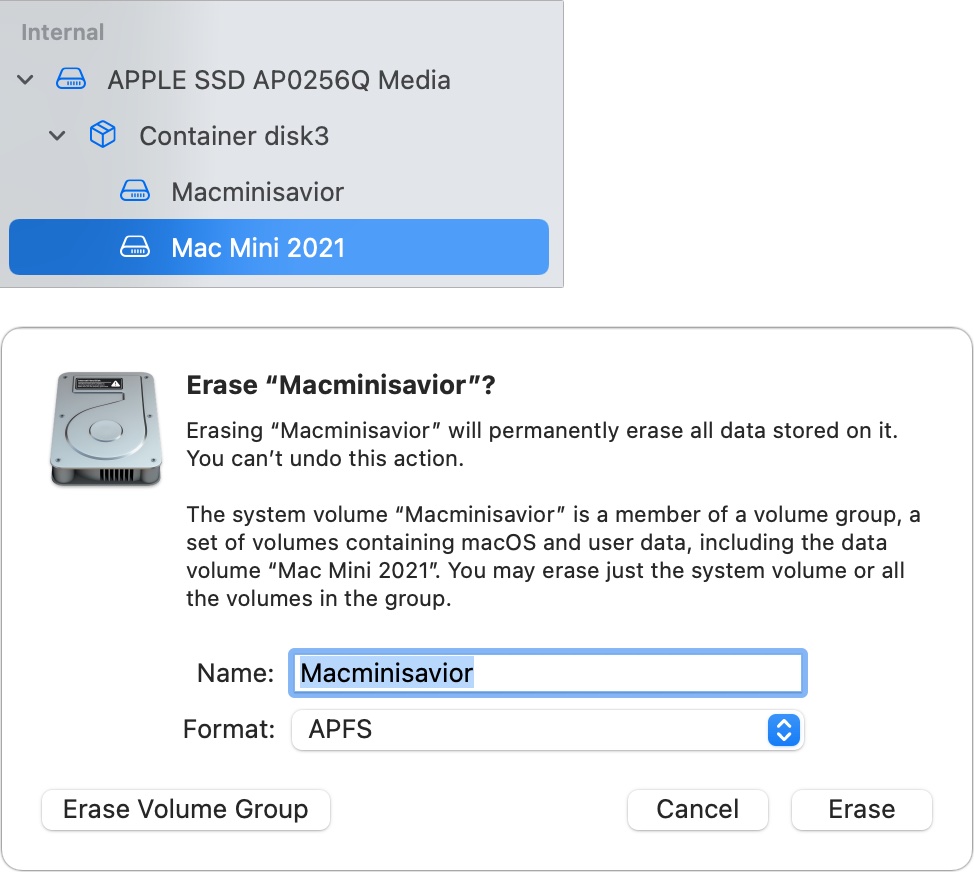
- Now that you remain in Healing, based on the directions above, you require to pick Disk Energy from the list.
- When in Disk Energy choose Macintosh HD (or whatever you have actually called your ‘disk drive’).
- There are different alternatives along the top: click Erase.
- You need to see the name of your drive and the format need to be APFS. Beneath you need to see a choice to Erase Volume Group (this will guarantee you erase both the Macintosh HD and Macintosh HD Data.)
- When you have actually erased the Macintosh HD you can then click any other drives and volumes and click the– to erase the volume.
To ensure you erase whatever you will require to select Erase Volume Group, if you do not see this choice attempt the directions listed below.
We’ll information how to erase your Mac in Catalina and Mojave at the end of this post as the procedure is a little more complex.
Reinstall macOS
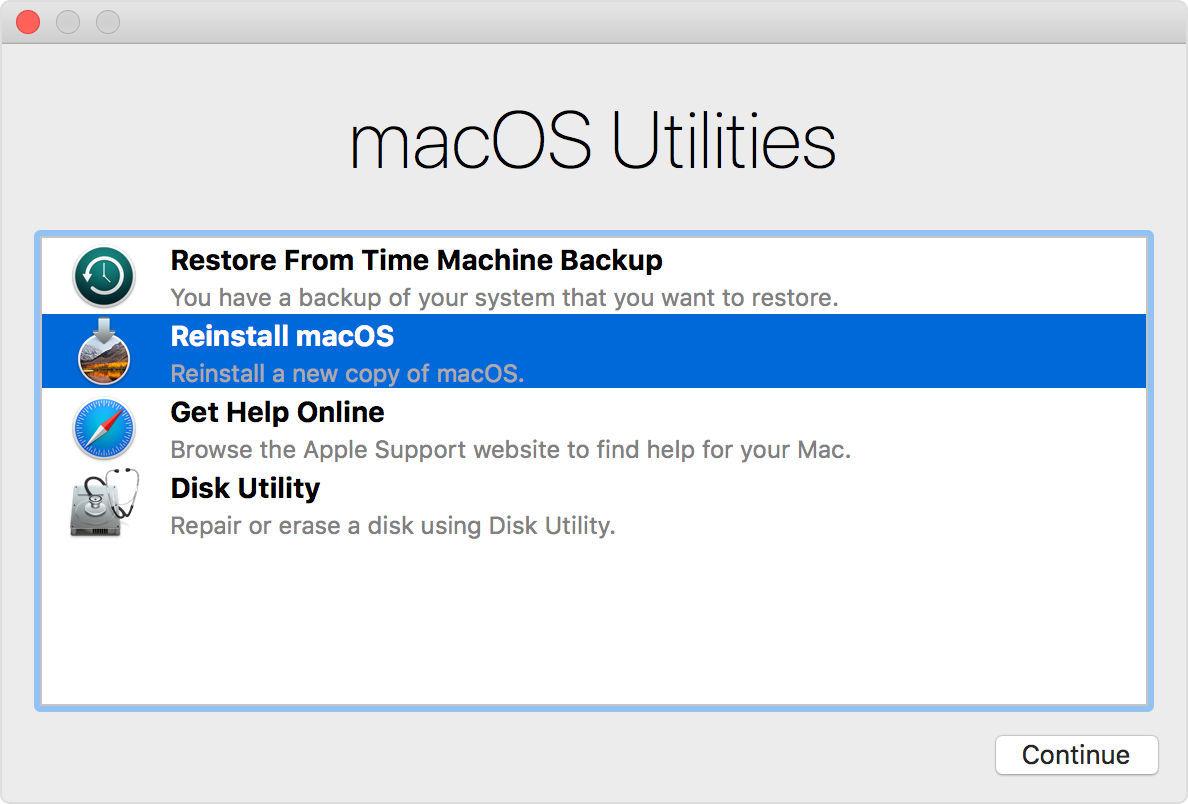
Foundry
The next action includes re-installing macOS– you can’t simply offer your Mac having actually eliminated the contents, if you do the brand-new user will be faced with a flashing enigma when they launch the Mac due to the fact that there will be no os set up. You require to re-install macOS prior to you can offer it on.
If you have an M1 or M2 Mac, or a Mac with the T2 chip, this will be managed by the Erase All Contents and Settings choice in System Preferences, as detailed above. However if that isn’t a choice for you then the listed below guide need to assist:
How to re-install macOS
Whether you are reselling the Mac, or simply preparing to continue to utilize the Mac and simply wished to do a tidy set up you will wish to set up a variation of macOS.
You need to still remain in macOS Utilities in Healing Mode based on the actions above.
- Pick Reinstall macOS from Utilities and follow the directions that appear to re-install macOS.
- Your Mac will begin to download and set up which ever variation of macOS your Mac was running– additionally, if you wished to set up an older variation of macOS we have more info listed below
- Ultimately after the longest-ever 49 minutes approximately your Mac will reboot. However the wait isn’t over. It will still take a little time while you launch and view the white bar. Ours stated 11 minutes staying around that time, however it took a lot longer than that. Simply leave your Mac to get on with it and disregard at any time staying indications.
- Lastly you will see the Welcome screen. If you are offering or handing down your Mac you can leave it at this phase due to the fact that the brand-new user will require to input their information. If you wish to continue to utilize the Mac then follow the actions to set it up.
How to set up an older variation or downgrade macOS

Foundry
The approach above will work if you wish to set up the current variation of macOS set up on the Mac. It will not update you to the current variation if you aren’t currently running it.
There are other alternatives if you wish to set up a various variation of the macOS.
Rather of pushing Command + R at launch you might push Shift + Option/Alt + Command R (if you are running Sierra 10.12.4 of later) to set up the variation of macOS that included your Mac, or the one closest to it that is still readily available. (Command + R will not deal with an M1 Mac).
Additionally you might make a bootable drive consisting of the variation of macOS that you wish to run and install it on your Mac utilizing that. Check out how to do that here:
How to make a bootable macOS installer on an external drive.
If you require to set up an older variation of the Mac os and are questioning how you can do that if you have not got the initial discs, read this:
How to set up old variations of macOS or Mac OS X.
We have another post that enters into more information on how to set up an older variation of macOS utilizing Healing mode
Erasing your Mac in Catalina, Mojave and earlier
As assured above, here are the actions to follow if you wish to erase your Mac in macOS Catalina or older.
We have more assistance here: How to eliminate a Mac’s drive in macOS Catalina, Big Sur, or Monterey
How to erase your Mac in Catalina
When Apple presented macOS Catalina in 2019 it included a brand-new read-only volume where the os lives. This volume is Macintosh HD (yours might have a various name). Together with it you will likewise have a Macintosh HD– Data volume. This is where your information lives.
The factor Apple separated the 2 volumes in Catalina is to guarantee that crucial os information can’t be overwritten. Since of this additional volume the procedure is a little bit various to how it deals with older Mac.
- Based on the actions above launch your Mac in Healing.
- When Healing launches select Disk Energy.
- You need to see 2 disks– Macintosh HD and Macintosh HD– information (revealed listed below– sorry about image quality!) This information drive is where your information is kept independently to the macOS setup. (It’s possible your drive is called something else, like House HD for instance).

- Click this Macintosh HD– Data drive to pick it.
- Either click the– button or go to the menu and select Edit > > Erase APFS volume.
- You will see a message caution you that this will completely eliminate your information. Click Erase.
- Wait while the volume is erased.

- Now you require to return to Disk Energy to erase the Macintosh HD. You need to do both actions as you will not simply have the ability to re-install macOS over the top of macOS. And you will require to re-install the macOS in order to recreate the Macintosh HD-Data volume. Click Macintosh HD to pick it.
- We suggest that you click Unmount. At first when we attempted to erase Macintosh HD we saw a mistake message that mentioned: Eliminate procedure has actually stopped working due to the fact that volume Macintosh HD on disk 2s5 could not be unmounted due to the fact that it remains in usage by procedure 793 (kextcache). Unmounting very first repaired this issue.
- With Macintosh HD still chose click Erase.

- Go into a name you wish to offer the drive when you have actually reformatted it, such as Macintosh HD.
- Pick the format. This is will be APFS if you are utilizing Catalina– older OSs may have had the choice of Mac OS Extended (Journaled).
- Click Eliminate and enter your Apple ID if needed. Wait.
- Now gave up Disk Energy to go back to the MacOS Utilities screen.
How to erase your Mac in Mojave or earlier
The procedure for erasing and reformatting your Mac is a little less made complex in macOS Mojave or earlier as there isn’t the 2nd Information volume to erase initially.
As above, launch in Healing.
- Select Disk Energy from the alternatives, and click Continue.
- Click your primary disk drive, normally called Macintosh HD, in the sidebar left wing. You’re trying to find the disk name, not the volume name indented below it if that appears.

- To clean your disk drive, click the Erase button, then click Erase. Keep in mind that this completely eliminates all information on the disk drive so do not do this unless you have actually cloned the drive or more than happy to never ever access anything on that drive once again.

- When it’s completed, leave the program by going to the leading menu and choosing Disk Energy > > Quit Disk Energy.